How To Capture Dumps
在我们日常调试程序时我们经常会需要抓取 DUMP 来做分析,本文主要介绍了各种场景下使用 Procdump 和 DebugDiag 抓取 DUMP 的方法。
High CPU
Capture Dumps with Procdump When High CPU
-
Download Procdump
-
Run CMD as administrator and run below command:
procdump -ma -c 80 -n 3 -s 5 ApplicationNameOrPIDNote: Replace “ApplicationNameOrPID” to the name or PID of your application . If your application have more than one instance, please use PID of your application.
使用 Procdump 抓取高 CPU 时的 DUMP
-
下载 Procdump;
-
以管理员权限运行 CMD 并执行以下命令:
procdump -ma -c 80 -n 3 -s 5 ApplicationNameOrPID注意事项: 上述命令中 ApplicationNameOrPID 需要被替代成发生问题的应用名称或者 PID。
Capture Dumps with DebugDiag When High CPU
-
Download and install Debugdiag
-
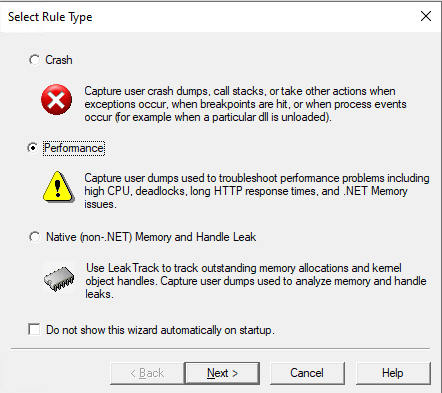
Run Debugdiag 2 Collection and select “Performance” in Select “Rule Type” tab, Then “Next”;
-
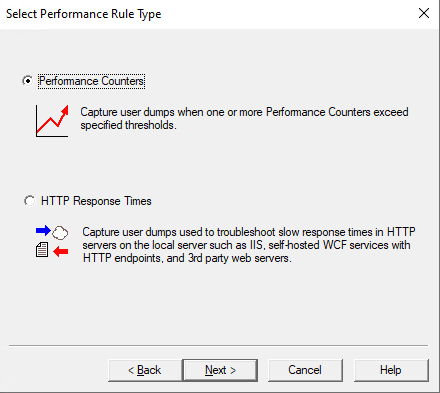
Select “Performance Counters” in “Select Performance Rule Type” tab, Then “Next”;
-
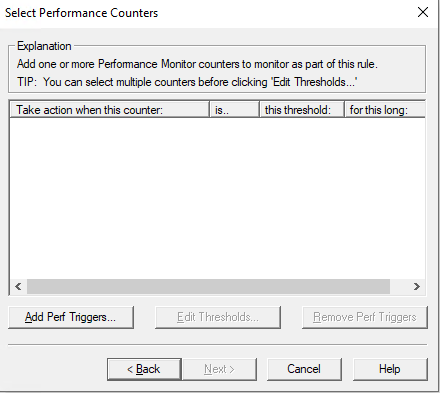
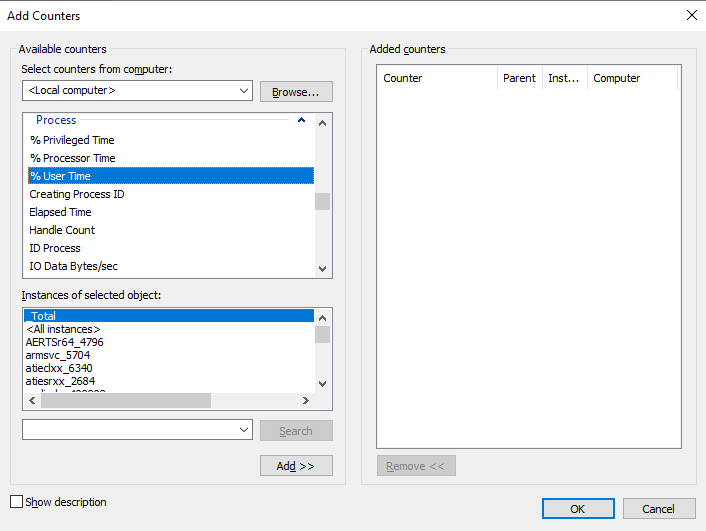
Click “Add Perf Triggers” in “Select Performace Counters” tab, Then Select “Process:%User Time” of your Application instance, Then click “Add” and “OK”;
-
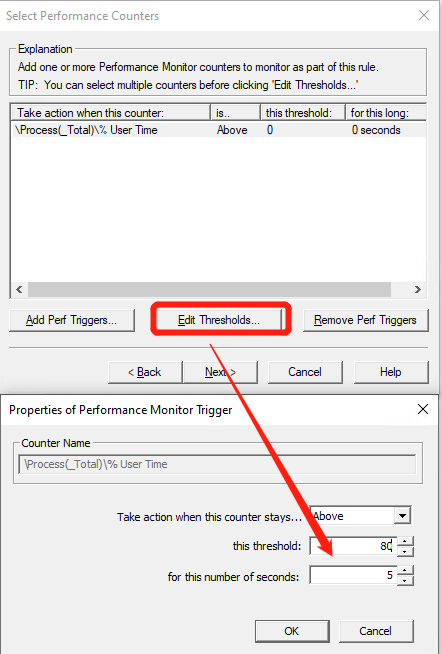
Click “Edit Thresholds” and set the threshod to 80*LogicalCore and set “for this number of seconds” to 5 seconds, and then click “Next”;
-
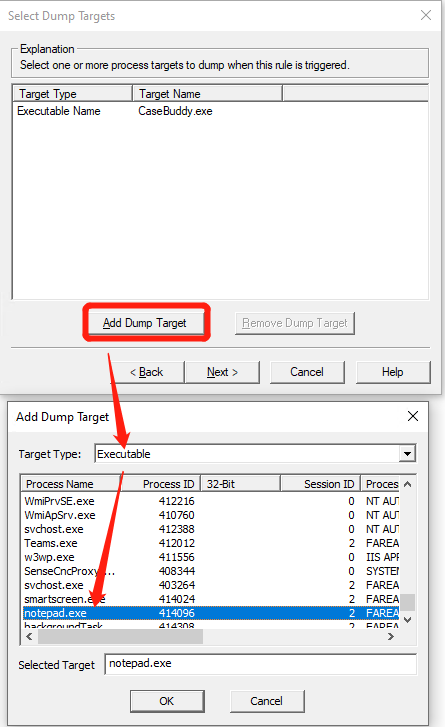
Click “Add Dump Target” in “Select Dump Targets” tab and select “Executeable” in the dropdown list and then choose your application in process list, Then click “OK” and “Next”;
-
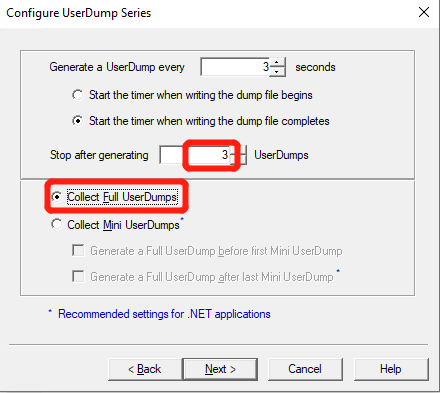
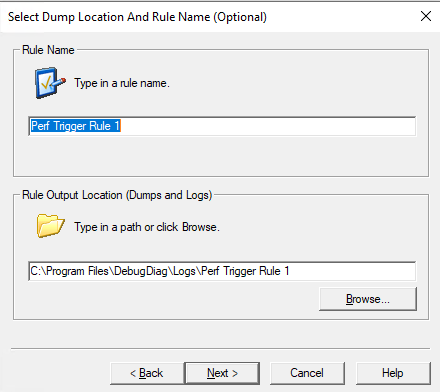
Set the value of “Stop after generating” to 3 and Click on the radio of “Collect Full UserDump” and then Click “Next” –> “Next” –> “Finish”.
如何使用 Debugdiag 抓取 High CPU 时的 DUMP
-
下载并安装 Debugdiag
-
运行 Debugdiag 2 Collection 并在”Rule Type” 界面中选择 “Performance”, 然后点击 “Next”;

-
在 “Select Performance Rule Type” 页面中选择”Performance Counters”, 然后点击 “Next”;

-
在 “Select Performace Counters” 页面中点击 “Add Perf Triggers”, 然后选择 “Process:%User Time”,在进程列表中选择应用对应的实例, 然后点击 “Add” 和 “OK”;


-
点击 “Edit Thresholds” 并将阈值设置为 80*LogicalCore 并将 “for this number of seconds” 设置为 5 秒, 然后点击 “Next”;

-
在 “Select Dump Targets” 页面中点击 “Add Dump Target” 并且在下拉列表中选择”Executeable” 然后选择出问题的应用名称,然后点击 “OK” 和 “Next”;

-
设置 “Stop after generating” 值为 3 并且点击 “Collect Full UserDump” ,然后点击”Next” –> “Next” –> “Finish”.


CRASH
Capture Dumps with Procdump When Application Crash
-
Download Procdump
-
Get the Exception information from Application Event log;
-
Run CMD as administrator and run below command:
procdump -ma -e -f "AccessViolationException" ApplicationNameOrPIDNote:
- Replace “ApplicationNameOrPID” to the name or PID of your application . If your application have more than one instance, please use PID of your application.
- We assume the exception in application event log is AccessViolationException. And we should replace the “AccessViolationException” to the exception in your application Error log.
-
下载 Procdump;
-
从应用程序日志中获取异常名称;
-
以管理员权限运行 CMD 并执行以下命令:
procdump -ma -e -f "AccessViolationException" ApplicationNameOrPID注意事项:
- 上述命令中 ApplicationNameOrPID 需要被替代成发生问题的应用名称或者 PID。
- 在此命令中我们假设应用程序日志中获取的异常名称为 AccessViolationException。实际需要替代成应用程序日志中获取的异常名称。
Capture Dumps with Debugdiag When Application Crash
Capture Dumps with WER When Application Crash
We usually use WER to capture dumps if there is an Application Error log in Application Event logApplication Crash when application crashes.
Collect WER Dump with Registry Script
-
Copy below content to notepad and save as WER.reg;
Windows Registry Editor Version 5.00 [HKEY_LOCAL_MACHINE\SOFTWARE\Microsoft\Windows\Windows Error Reporting\LocalDumps\iexplore.exe] "DumpFolder"="c:\\WERDumps" "DumpType"=dword:00000002 "DumpCount"=dword:00000003 [HKEY_LOCAL_MACHINE\Software\Microsoft\Windows\Windows Error Reporting] "DontShowUI"=dword:00000001 [HKEY_LOCAL_MACHINE\SOFTWARE\Wow6432Node\Microsoft\Windows\Windows Error Reporting\LocalDumps\iexplore.exe] "DumpFolder"="c:\\WERDumps" "DumpType"=dword:00000002 "DumpCount"=dword:00000003 [HKEY_LOCAL_MACHINE\Software\Wow6432Node\Microsoft\Windows\Windows Error Reporting] "DontShowUI"=dword:00000001 -
Create a folder in C volume named with C:\WERDumps
-
Replace iexplore.exe to your own application name and then merge the registry script;
使用注册表脚本收集完成 WER DUMP
-
将以下内容复制到 Notepad 中并保存为 WER.reg;
Windows Registry Editor Version 5.00 [HKEY_LOCAL_MACHINE\SOFTWARE\Microsoft\Windows\Windows Error Reporting\LocalDumps\iexplore.exe] "DumpFolder"="c:\\WERDumps" "DumpType"=dword:00000002 "DumpCount"=dword:00000003 [HKEY_LOCAL_MACHINE\Software\Microsoft\Windows\Windows Error Reporting] "DontShowUI"=dword:00000001 [HKEY_LOCAL_MACHINE\SOFTWARE\Wow6432Node\Microsoft\Windows\Windows Error Reporting\LocalDumps\iexplore.exe] "DumpFolder"="c:\\WERDumps" "DumpType"=dword:00000002 "DumpCount"=dword:00000003 [HKEY_LOCAL_MACHINE\Software\Wow6432Node\Microsoft\Windows\Windows Error Reporting] "DontShowUI"=dword:00000001 -
创建文件夹 C:\WERDumps
-
将程序名 iexplore.exe 替换成需要抓取 WER DUMP 的应用程序名,然后将脚本合并至注册表;
通过注册表编辑器配置 WER
-
在运行中通过命令 %windir%\regedit.exe 打开注册表编辑器;
-
定位到注册表 HKEY_LOCAL_MACHINE\SOFTWARE\Microsoft\Windows\Windows Error Reporting\LocalDumps,如果该注册表不存在,则创建该键;
-
在该键下创建子键,键名为应用程序名称,以下以 iexplore.exe 举例;
-
在应用程序名称子健下创建以下三个键值:
Value Name Type Value DumpFolder REG_EXPAND_SZ C:\Dumps DumpCount REG_DWORD 5 DumpType REG_DWORD 5 DumpFolder 根据实际情况选择合适路径即可,在配置注册表前,请先创建该文件夹。
-
在问题复现后,程序崩溃的 DUMP 将会生成在 DumpFolder 键值对应的文件夹下。
HANG
We usually use procdump to capture hang dump.
Capture Hand DUMP with Procdump
-
Download Procdump
-
Run CMD as administrator and run below command:
procdump -ma -h -n 3 -s 5 ApplicationNameOrPIDNote: Replace “ApplicationNameOrPID” to the name or PID of your application . If your application have more than one instance, please use PID of your application.
使用 Procdump 抓取 Hang DUMP
-
下载 Procdump;
-
以管理员权限运行 CMD 并执行以下命令:
procdump -ma -h -n 3 -s 5 ApplicationNameOrPID注意事项: 上述命令中 ApplicationNameOrPID 需要被替代成发生问题的应用名称或者 PID。
Memory Leak
How to Capture DUMP for Native Memory Leak with Debugdiag
使用 DebugDiag 抓取 Native 内存泄漏的 DUMP
-
下载并安装 Debugdiag
-
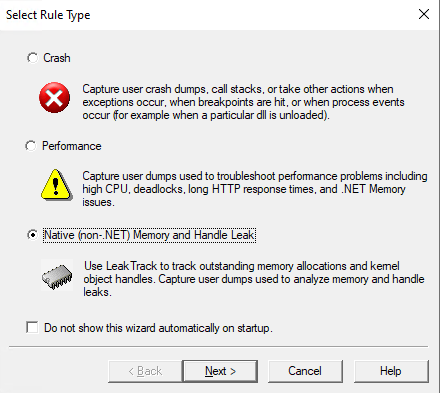
运行 Debugdiag 2 Collection 并在”Rule Type” 界面中选择 “Native (non-.NET) Memory and Handle Leak”, 然后点击 “Next”;
-
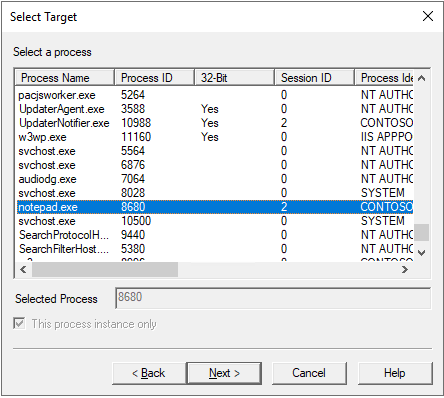
在 “Select Target” 界面中选择存在内存泄漏或者 Handle 泄露的目标进程,然后点击 “Next”;
-
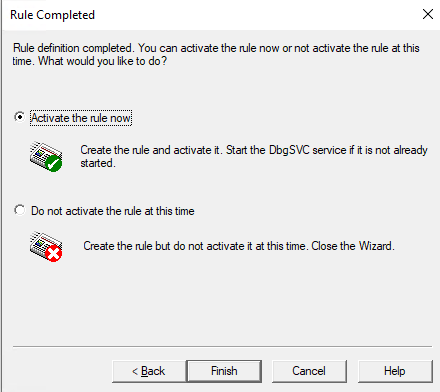
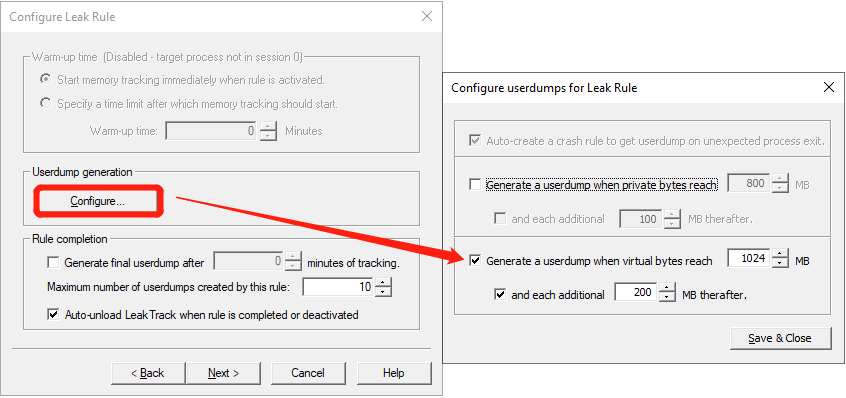
在 “Configure Leak Rule” 界面点击 “Configure”,在弹出框中勾选 “Generate a userdump when virtual bytes reach”,并设置阈值,默认为 1024MB;然后勾选 “and each addtional MB therafter”,并设置内存增量,默认设置为 200MB,然后点击 “Save&Close”; 勾选 “Auto-unload LeackTrack when rule is completed or deactivated”,点击 “Next” –> “Next” –> “Finish”;
-
设置好规则后,默认会存在两条规则,当内存达到阈值时,Debugdiag 会自动抓取 DUMP,后续每增加设置的增量内存值时抓取一个 DUMP。生成的 DUMP 默认存在于 “C:\Program Files\DebugDiag\Logs” 下。
How to Capture DUMP for Native Memory Leak with Procdump
Assume your application is TestLeak.exe
-
Enable User Stack Trace for your application: we have below two methods
-
Using Gflags: install Debugging Tools for Windows
-
Install the Debugging Tools for Windows to get the GFlags.exe tool
-
Open an admin cmd window and Enable UST for TestLeak.exe as follows:
gflags -i TestLeak.exe +ust
-
-
Registry
-
Create the following value under “HKEY_LOCAL_MACHINE\SOFTWARE\Microsoft\Windows NT\CurrentVersion\Image File Execution Options” with below registry script:
Windows Registry Editor Version 5.00
[HKEY_LOCAL_MACHINE\SOFTWARE\Microsoft\Windows NT\CurrentVersion\Image File Execution Options\TestLeak.exe]
"GlobalFlag"=dword:0x1000
-
-
-
Restart the process. If your application is critical process, you will need to restart the server
-
Repro the issue
-
Capture a memory dump of TestLeak.exe with full process memory:
procdump -ma -m 1500 TestLeak.exeIf we want to capture more than one dump, we can start more than one instance and modify the value after -m to target commit memory threshold.
-
Disable UST for your application:
-
Using Gflags:
gflags -i TestLeak.exe -ust -
Registry
  Windows Registry Editor Version 5.00
  [HKEY_LOCAL_MACHINE\SOFTWARE\Microsoft\Windows NT\CurrentVersion\Image File Execution Options\TestLeak.exe]
  "GlobalFlag"=-
-
-
Restart the server
如何使用 Procdump 抓取 Native 内存泄漏的 DUMP
以下假设您的应用名为TestLeak.exe,以下步骤中的 TestLeak.exe 均需要替代为您的应用名称。
-
下载 Procdump;
-
开启用户态调用栈跟踪数据库:我们有两种方法
-
使用 Gflags: 该方法需要安装 Debugging Tools for Windows
-
下载并安装 Debugging Tools for Windows;
-
以管理员权限运行 CMD 并运行以下命令:
gflags -i TestLeak.exe +ust
-
-
注册表
-
合并以下注册表:
Windows Registry Editor Version 5.00
[HKEY_LOCAL_MACHINE\SOFTWARE\Microsoft\Windows NT\CurrentVersion\Image File Execution Options\TestLeak.exe]
"GlobalFlag"=dword:0x1000
-
-
-
重新启动进程,如果您需要调试的是系统关键进程或者服务,则需要重启机器;
-
复现问题;
-
使用如下命令创建 DUMP:
procdump -ma -m 1500 TestLeak.exe -
禁用用户态调用栈跟踪数据库:
-
使用 Gflags:
gflags -i TestLeak.exe -ust -
使用注册表
  Windows Registry Editor Version 5.00
  [HKEY_LOCAL_MACHINE\SOFTWARE\Microsoft\Windows NT\CurrentVersion\Image File Execution Options\TestLeak.exe]
  "GlobalFlag"=-
-
-
重启机器
文档信息
- 本文作者:Robin Chen
- 本文链接:https://crushonme.github.io/wiki/How-To-Capture-Dumps/
- 版权声明:自由转载-非商用-非衍生-保持署名(创意共享4.0许可证)
Document Information
- Author :Robin Chen
- Link : https://crushonme.github.io/wiki/How-To-Capture-Dumps/
- Copyright:Attribution-NonCommercial-NoDerivatives-No additional restrictions(CC BY-NC-ND 4.0)
